Employee Directory
 The Vitextra Employee Directory web part helps you find the right colleague and reach out at the right moment. This quick-start guide walks end users through the essentials: the list view, the search box, the quick-filter bar, and the persona card.
The directory at a glance
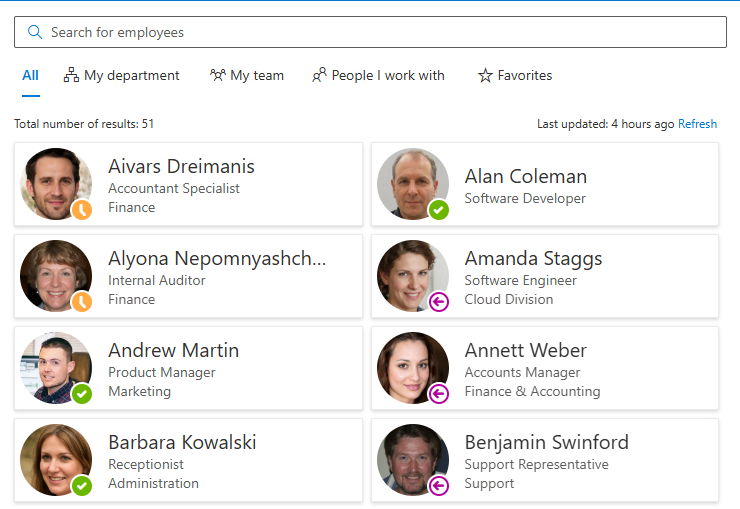

When a page or Microsoft Teams tab with the Employee Directory web part opens, you see every published employee at once. The interface has four main areas: the search box for typing a query, the quick-filter bar for narrowing the list in one click, the results list with a card for each person, and the persona card that slides in when you select someone.
📝 Note
The exact layout depends on how an administrator configured the web part. Some elements — such as the quick-filter bar or the search box — can be hidden, so your view may differ slightly from the screenshots in this article.
Finding a person
Search box
Start typing in the search box — labeled Search for employees — and the list narrows as you type. The search is "soft": it tolerates small typos and partial words, so you don't need an exact match to find someone. It looks across name, job title, department, and other profile fields.
If an administrator has enabled Search by skills, your query is also matched against the skills in each person's profile. Matching skills are highlighted and shown first in the Skills column, which makes it easy to answer questions such as "who knows Power BI?" or "who speaks Spanish?".
📝 Note
When nothing matches your query, the list shows No results found. Clear the search box to return to the full directory.
Quick filters
The quick-filter bar above the list lets you narrow the directory to a relevant group of people without typing a query. Select a filter to apply it; select it again to turn it off.
- My department — colleagues in your own department.
- My team — your manager and the people who report to the same manager as you.
- People I work with — the colleagues you interact with most often, based on Microsoft 365 signals.
- Favorites — the people you have starred.

📝 Note
My department and People I work with rely on your own profile and Microsoft 365 data. If they return nothing, your profile may be incomplete or the required permissions may not be granted — ask your administrator to check. See the Using quick filters article for details.
Switching views and grouping
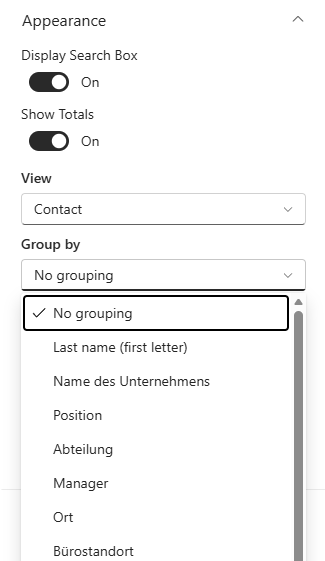
You can display the directory as compact Contact cards or as a detailed Details table. Use the view switch in the command bar to choose the layout that suits you.
The Group by option organizes the results into sections — for example, by Department or by the first letter of the last name. Grouping works together with search and quick filters, so you can, say, filter to your department and still group the remaining people by job title.
The persona card
Select any employee to open the persona card — a panel with the person's full details and everything you need to get in touch. Which sections appear depends on the web part configuration and on the Microsoft Graph permissions your organization has granted.

At the top you see the person's photo with a real-time Microsoft Teams presence indicator (Available, Busy, and so on), their name, and their job title. Below that is a row of actions:
| Action | What it does |
|---|---|
| Teams | Start a chat with the person in Microsoft Teams |
| Call in Teams | Place a call in Microsoft Teams |
| Send E-mail | Open a new e-mail addressed to the person |
| Copy e-mail address | Copy the person's e-mail address to the clipboard |
| Schedule a meeting | Open a new meeting invite with the person added |
| Download vCard | Save the contact as a .vcf file |
| Add to favorites | Star the person so they appear under the Favorites quick filter |
📝 Note
Administrators can enable or disable each action independently, so you may not see all of the buttons above.
Further down, the persona card can show:
- Local time and Working hours — the person's current local time, the offset from your own time zone, and whether they are within their working hours or Outside working hours. This helps you avoid messaging a colleague in the middle of their night.
- Availability — the person's Free/Busy for today shown next to your own, so you can pick a good moment to talk.
- Manager and direct reports — links you can follow to move through the org chart.
- About, Interests, and Skills — background information from the person's profile.
💡 Tip
Use the star on a colleague's card to add them to Favorites. Your favorites are saved per user and stay in place between sessions, so the people you contact most are always one click away.
Next steps
Now that you know your way around the directory, explore the individual features in more detail:
- Using quick filters — how My department, My team, People I work with, and Favorites work, and when to use each.
- Searching employees by skills — how skills search works and how skills are sourced from the Entra ID profile.
- Managing favorites — adding, removing, and where favorites are stored.
- Local time and working hours on the persona card — what the indicators mean and where the data comes from.
- Checking availability (free/busy) in the schedule tab — reading your and the person's availability for the day.