 Organizational Chart
 Introduction
This article explains how to place the Vitextra Organizational Chart web part on a SharePoint Online page and configure it through its property pane: from approving the required API permissions to choosing the chart mode, the layout, the attributes on employee cards, the filters and the export formats. It assumes the Organizational Chart package has already been deployed to your tenant App Catalog.
💡 Tip
If the web part is not yet available on your site, deploy it first — see KB10035. Installing Cloud-based Product. For an overview of what the web part does, see KB10232. Organizational Chart. Solution Overview.
Prerequisites
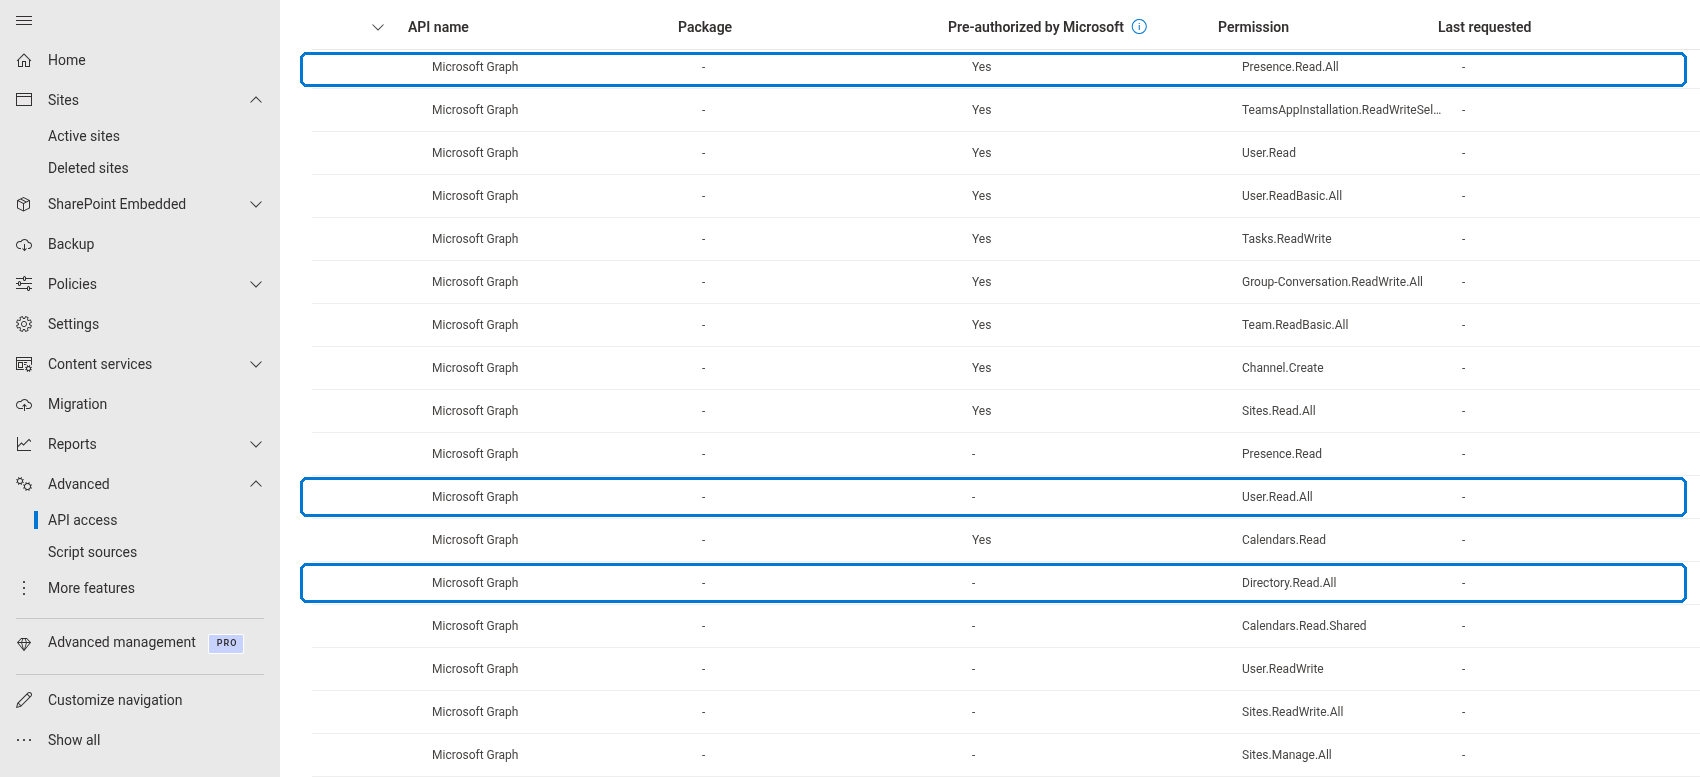
Organizational Chart reads employee data from Microsoft Entra ID through the Microsoft Graph API, so the web part can only build the chart once the following permissions have been approved for your tenant:
| Permission | Used for |
|---|---|
Directory.Read.All | Reading the directory structure and the manager–employee relationships |
User.Read.All | Reading user profiles and employee photos |
Presence.Read.All | Showing the Microsoft Teams presence status on cards |
The permission requests are registered automatically when the package is deployed. To approve them, a Global or SharePoint Administrator opens the SharePoint admin center, goes to Advanced → API access, selects each pending request for Microsoft Graph and clicks Approve.
❗ Important
Until the permissions are approved, the web part cannot load employees and shows an error instead of the chart. If only Presence.Read.All is missing, the chart works but no presence indicators are displayed.
To add the web part to a page you need edit permissions on that page — typically the Site owner or Site member role.
Adding the web part to a page
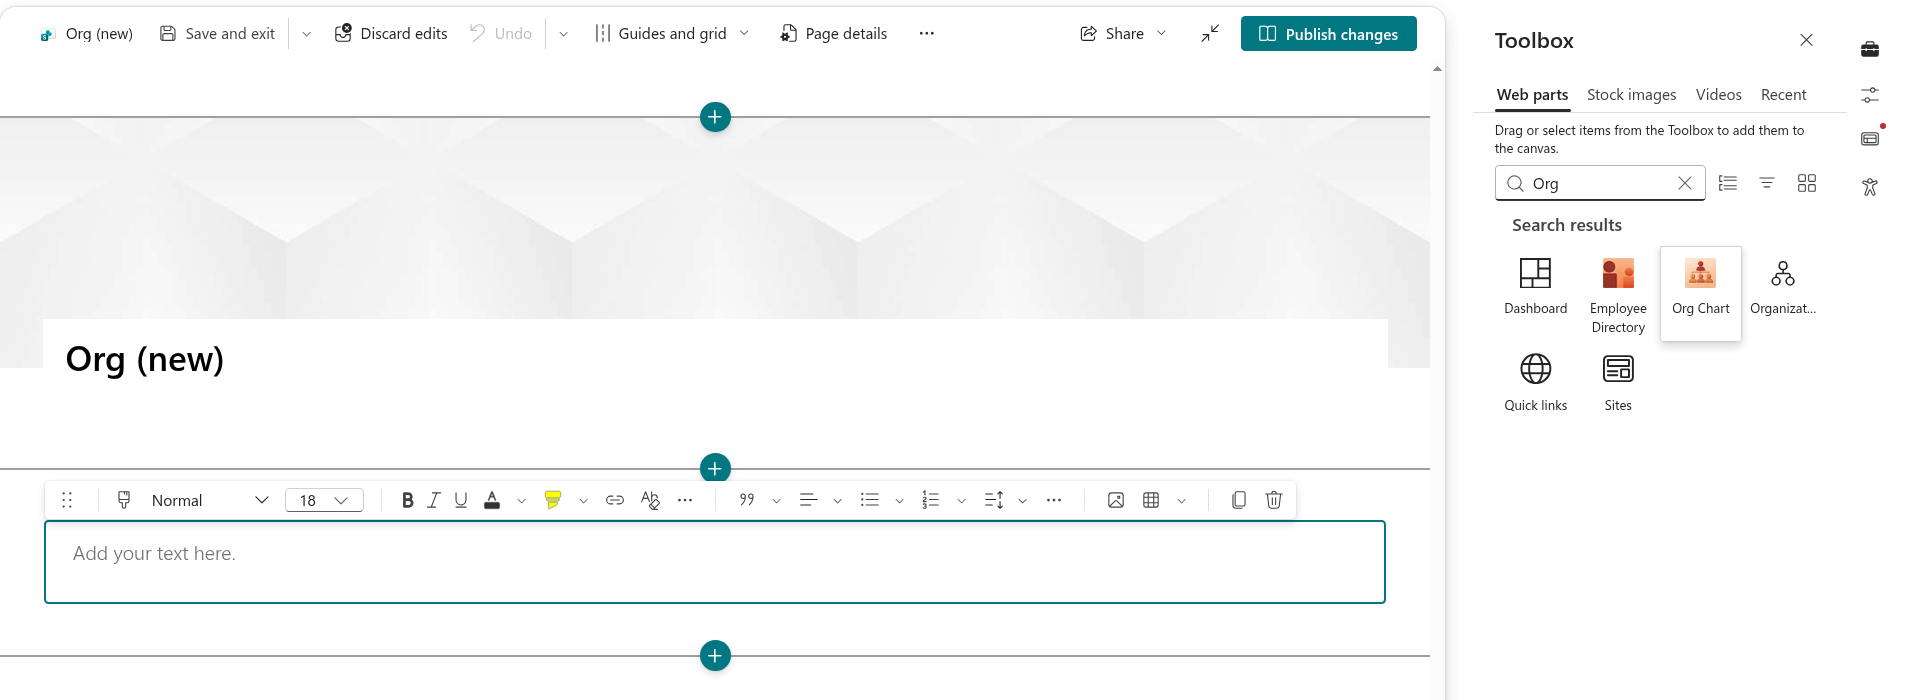
- Open the page where the chart should appear and switch it to edit mode with Edit in the top-right corner.
- Hover over the area where the web part should go and click the round + (Add a new web part) button.
- In the toolbox, start typing Org Chart and select the web part from the list.
The web part is added to the page and immediately builds the chart of the entire company with the default settings.
💡 Tip
The horizontal tree benefits from space. Place the web part in a full-width section, or in a one-column section, so that several branches fit side by side without zooming out.
Configuring the web part
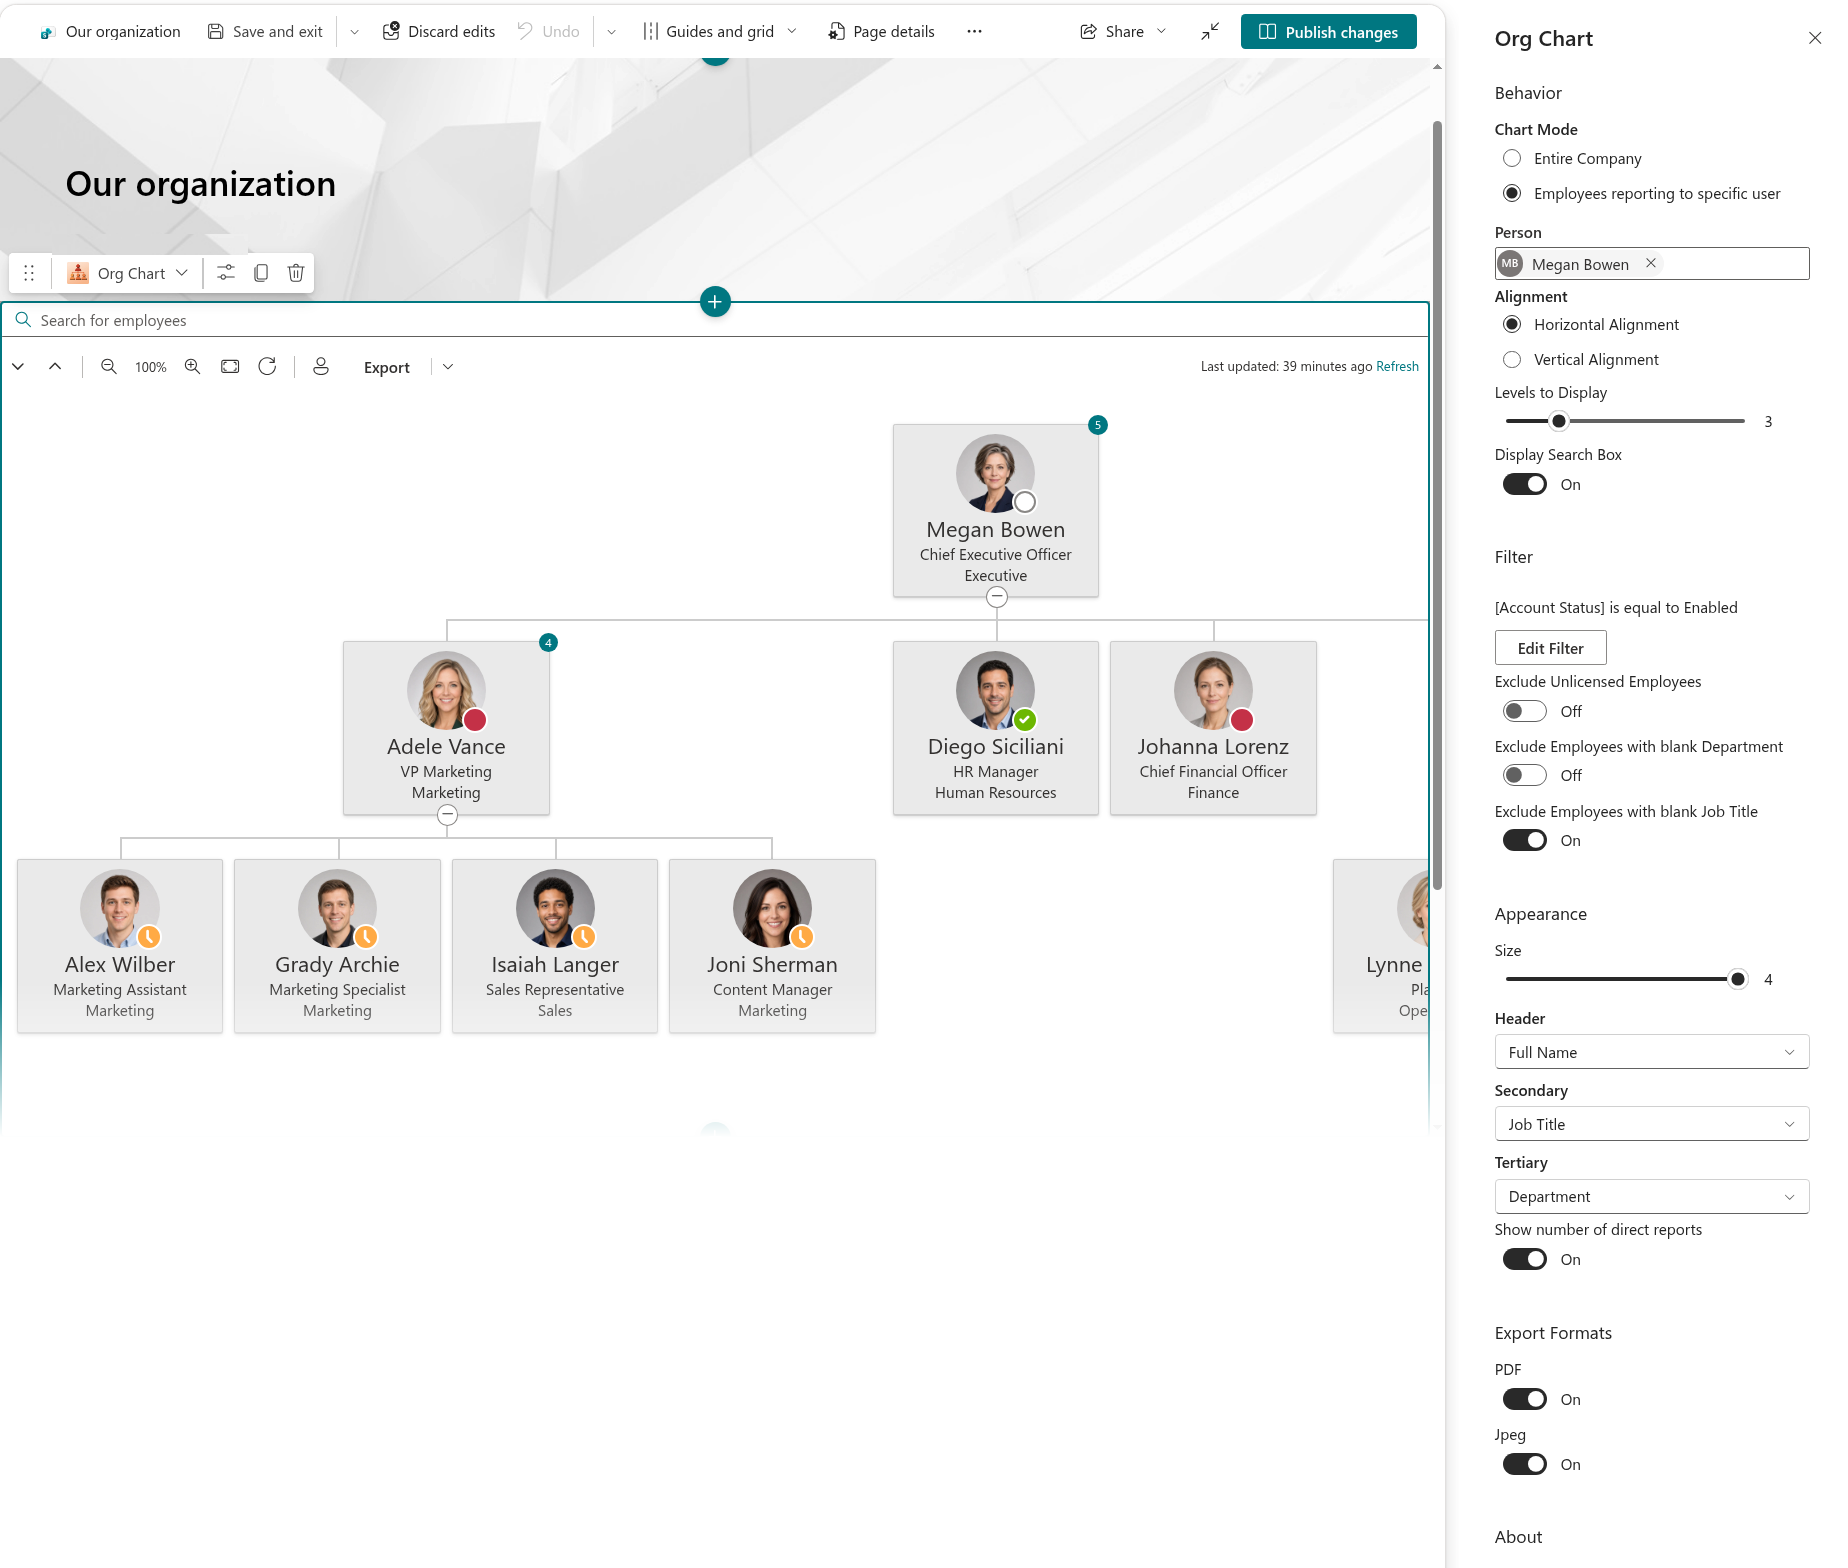
Select the web part and click the pencil (Edit web part) icon to open the property pane. The settings are organized into the groups described below.
Behavior
- Chart Mode — what the chart starts from:
- Entire Company — the roots of the chart are the employees who have no manager assigned in Microsoft Entra ID (typically the CEO), and the full hierarchy is shown beneath them.
- Employees reporting to specific user — the chart starts from one person and shows everyone who reports to them at any level. When this option is selected, a Person picker appears: start typing a name and select the employee. The chart is rebuilt as soon as a person is chosen.
- Alignment — the layout of the chart: Horizontal (a top-down tree that can be panned and zoomed) or Vertical (a compact indented list suited to narrow columns and mobile screens).
- Levels to Display — how many levels of the hierarchy are expanded when the page opens, from 1 to 10 (default 3). Deeper levels stay collapsed until a visitor expands them.
- Display Search Box — shows or hides the search box above the chart.
📝 Note
In the Employees reporting to specific user mode the web part shows the message User not defined until a person is selected. If the selected account is later removed from the directory, the message User not found in Azure AD appears instead — pick another person or switch back to Entire Company.
Filter
This group controls which employees are included in the chart.
- Advanced filtering — click Edit Filter to open the query builder. Add conditions on any card attribute (department, job title, city, country, user name and so on), choose an operator for each — is equal to, is not equal to, contains, does not contain, begins with, ends with, contains data, does not contain data and others — and combine conditions and groups with And/Or logic. By default a single condition is present: Account Status is equal to Enabled, which keeps disabled accounts out of the chart. Until you change it, the property pane shows No filter applied.
- Exclude Unlicensed Employees — hides accounts without any Microsoft 365 license assigned, such as shared mailboxes and service accounts (on by default).
- Exclude Employees with blank Department — hides accounts whose Department field is empty (off by default).
- Exclude Employees with blank Job Title — hides accounts whose Job Title field is empty (on by default).

❗ Important
Filters and exclusions are applied after the directory is loaded, before the tree is built. If a filter removes a manager but keeps their reports, those reports lose their connection to the rest of the hierarchy and disappear from the chart together with their whole branch. When you narrow the chart to a department, make sure the department head matches the filter too.
💡 Tip
See KB50026. How to Filter the Organizational Chart to Show a Specific Department for a worked example of a department filter.
Appearance
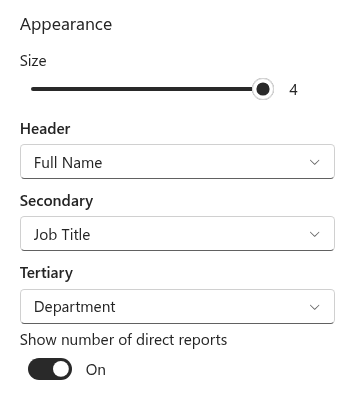
- Size — the size of employee cards, from 1 (compact, name only) to 4 (large, with a photo and three lines of text). The default is 4.
- Header, Secondary and Tertiary — the attributes shown on each card. The Header field is always available; Secondary appears for sizes 2 and above and Tertiary for size 4 only. Each field can be set to one of the following attributes: Full Name, ID, Department, Job Title, Cell phone, First Name, Last Name, User Name, Email, State/Province, ZIP/Postal Code, Address, City, Country/Region or Office Location. The defaults are Full Name, Job Title and Department.
- Show number of direct reports — adds a badge to each card with the number of the person's direct reports (off by default).
Export Formats
Two toggles, PDF and Jpeg, control which formats are offered by the Export button above the chart. Both are on by default; turn both off to remove the button entirely.
Microsoft Teams
This group appears only when the web part runs inside Microsoft Teams — as a personal app or a channel tab. The Save current settings as Microsoft Teams default button stores the current configuration as the tenant-wide default, so that every user who opens the personal app sees the chart configured the same way. A confirmation message appears once the settings are saved.
About
Shows the license status (trial, active or expired), the product version, the tenant ID and the start date, and offers the trial and activation actions.
💡 Tip
For details on assigning a license to your tenant, see KB10037. View Subscriptions.
Summary of settings
| Group | Setting | Values | Default |
|---|---|---|---|
| Behavior | Chart Mode | Entire Company / Employees reporting to specific user | Entire Company |
| Behavior | Person | An employee (Reports To mode only) | — |
| Behavior | Alignment | Horizontal / Vertical | Vertical |
| Behavior | Levels to Display | 1 – 10 | 3 |
| Behavior | Display Search Box | On / Off | On |
| Filter | Advanced filtering | Query builder conditions | Account Status is Enabled |
| Filter | Exclude Unlicensed Employees | On / Off | On |
| Filter | Exclude Employees with blank Department | On / Off | Off |
| Filter | Exclude Employees with blank Job Title | On / Off | On |
| Appearance | Size | 1 – 4 | 4 |
| Appearance | Header / Secondary / Tertiary | One of 15 profile attributes | Full Name / Job Title / Department |
| Appearance | Show number of direct reports | On / Off | Off |
| Export Formats | PDF, Jpeg | On / Off | On, On |
Publishing the page
When the chart looks right, click Republish (or Publish) to make the page available to your visitors. The settings are saved with the page, so every visitor sees the same mode, layout and filters; what they can change is the zoom, the expanded branches and the search query — see KB10234. Organizational Chart: A Quick Guide for End Users.
Learn more about the product: https://vitextra.com/en/products/org-chart