Introduction
The five icon sets of Smart Tiles cover most intranet links, but some destinations deserve their own picture: the logo of a partner system, the brand mark of an internal project, an icon drawn in the corporate style. For these the web part accepts any image in place of the icon. This article explains how to assign the image, what to prepare and how the image is displayed.
Assigning an image
- Open the page in edit mode and click the … button of the tile.
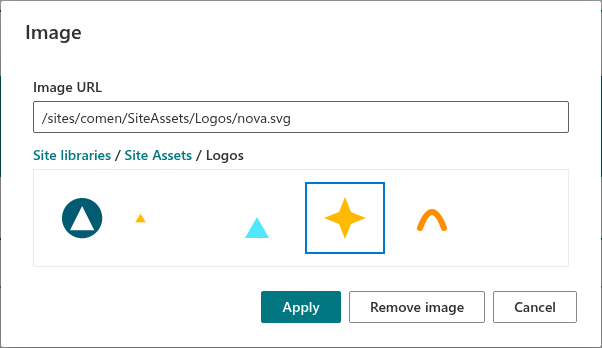
- Point to Tile Icon and choose Custom image. The Image dialog opens.
- Provide the image in one of two ways:
- type or paste its address into the Image URL field, or
- browse the libraries of the site in the list below the field: click a library, open folders if necessary and click the image. Its address is placed into the field.
- Click Apply.
The image replaces the icon on the tile immediately. In the Tile Icon submenu the Custom image item is now marked with a check mark.
The Image URL field
The field accepts an absolute address beginning with https:// or a path beginning with / — for example /sites/intranet/SiteAssets/logos/sap.svg. Other forms are rejected with a message under the field and Apply stays disabled.
Browsing the site libraries
The list under the field starts with the document libraries of the current site. Click a library to see its folders and the images in it as thumbnails; the label above the list shows the path you are in, and Back returns one level up. Only image files are listed — PNG, JPEG, GIF, SVG, WebP and BMP; a folder with no images and no subfolders shows No images in this folder.
📝 Note
The browser shows libraries of the current site only. To use an image stored on another site, paste its address into the Image URL field.
Preparing the image
The image is drawn at the Icon size of the web part — between 20 and 64 pixels — and is scaled to fit that square while keeping its proportions. For a clean result:
- use a square image with the subject filling the frame; wide logos become small when squeezed into a square;
- prefer SVG, or a PNG of at least 128 × 128 pixels, so the image stays sharp on high-resolution screens;
- use a transparent background, so the image sits on the tile color rather than in a white box;
- check the image against the tile color — a dark logo disappears on a dark tile.

Unlike standard icons, a custom image does not take the Font Color of the tile: it is shown with its own colors. The Shadow setting of the web part applies to custom images in the same way as to icons.
Where to store images
The Site Assets library of the site is the natural place: every visitor of the site can read it, and it is included when the site is backed up or restored. Any other library or site works as long as the people who see the tile can read the image — a visitor without access to the image sees an empty space where the icon should be.
❗ Important
Images are loaded by the visitor's browser straight from the address in the tile. An image on an external website must be served over HTTPS, and the web part cannot display it if that website forbids embedding.
Removing the image
To return to an icon, either pick an icon from any set in the Tile Icon submenu — this removes the custom image — or open Custom image again and click Remove image in the dialog.
💡 Tip
The same Image dialog is used for the background of a tile; see KB10245. Setting a Background Image for a Tile. The icon sets are described in KB10243. Choosing Icons for Tiles.
Learn more about the product: https://vitextra.com/en/products/smart-tiles