Smart Tiles
Introduction
A colored tile with an icon is clear and compact; a tile with a photograph is inviting. Smart Tiles lets any tile carry a background image instead of a flat color - a picture of the office for Visit us, a product shot for a launch page, a team photo for the department site. This article explains how to set the image, how it is displayed and how to keep the tile readable.
Setting the image
- Open the page in edit mode and click the … button of the tile.
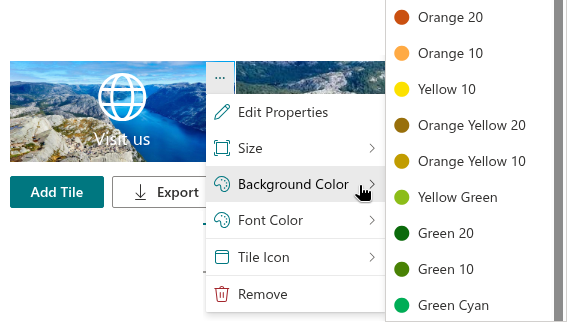
- Point to Background Color and choose Background image - the first item of the submenu.
- In the Image dialog, type or paste the address of the image into the Image URL field, or browse the libraries of the site and click the image.
- Click Apply.
The Image dialog is the same one used for custom icon images: the Image URL field accepts an address beginning with https:// or a path beginning with /, and the list below it browses the document libraries of the current site folder by folder, showing the images as thumbnails. The dialog is described in detail in KB10244. Using a Custom Image as a Tile Icon.
How the image is displayed
The image fills the entire tile: it is scaled so that it covers the tile completely and is centered, and whatever does not fit is cropped at the edges. The tile keeps its proportions - its width is set by the Size of the tile and its height by the content and the Internal Indent - so the same image is cropped differently on a Small and on a Full Width tile.
The title, description and standard icon are drawn over the image in the tile’s Font Color. Other icon sets and custom icons retain their own colors.

The color underneath
The background color of the tile does not disappear when an image is set: it is painted under the image and shows through while the image loads, through transparent areas of a PNG, and if the image cannot be loaded at all. Choose a color close to the overall tone of the picture, so that a tile that is still loading does not flash in a different color.
📝 Note
Choosing a color in the Background Color menu removes the background image and applies the selected color. Removing the image in the dialog instead restores the color stored beneath it.
Keeping the text readable
Text over a photograph is only as readable as the contrast between them. A few habits help:
- pick images with a calm area - sky, wall, water - where the title will sit, or crop the image so that such an area is in the center;
- use white text on dark pictures and black text on light ones, and set the Font Color accordingly;
- enable Shadow in the web part settings: the drop shadow under the icon separates it from a busy background;
- if all tiles should show only their images and icons, hide both titles and descriptions in the web part settings. Their text remains available in the tooltip.

The YouTube thumbnail
When the link of a tile points to a YouTube video, the Background Color menu gains one more item above Background image: Thumbnail. It uses the preview image of the video as the background, without storing an image address in the tile. On the published page a thumbnail tile shows only the play button; its title and description remain in the tooltip.
Image requirements
- The address must use
https://or be a path on the current tenant; visitors must have read access to the image. - Keep the file reasonably small - a photograph of 1200 pixels on its longer side, saved as JPEG or WebP, is enough for a Full Width tile and loads quickly on every page where the panel is used.
- Images with a transparent background show the tile color through the transparent areas, which can be used for watermark-style designs.
❗ Important
Images are loaded by the visitor's browser from the address in the tile. Store the images in a library that every visitor of the page can read - Site Assets of the same site is the usual choice. A visitor without access sees the background color only.
Removing the image
Either choose a color in the Background Color menu, or open Background image again and click Remove image in the dialog. The tile returns to its background color.
💡 Tip
The colors available for tiles and their font are described in KB10043. Tile Colors in Smart Tiles: Theme Accent and Predefined Colors.
Learn more about the product: https://vitextra.com/en/products/smart-tiles