 List Filter Online
 Introduction
List Filter Online is delivered as a single SharePoint Framework package. Installing it takes two steps that are usually done by two people: a SharePoint administrator uploads the package to the app catalog of the tenant, and a site owner adds the web part to a page and points it to a list or library. This article walks through both steps, from the downloaded ZIP file to a published page, and explains how to update the web part when a new version is released.
Prerequisites
Before you start, make sure that:
- the tenant has an app catalog. If it does not, a SharePoint administrator creates it in the SharePoint admin center under More features > Apps;
- you are a SharePoint administrator, or a member of the owners group of the app catalog, to upload the package;
- you are an owner of the site, or have edit permission on the page, to add and configure the web part;
- you have the downloaded package. It is a ZIP file named
Vitextra.ListFilterOnline.<year>Q<quarter>.zip, for exampleVitextra.ListFilterOnline.2026Q4.zip, and it contains the solution filevitextra.list-filter.sppkg. Extract the.sppkgfile before uploading.
📝 Note
List Filter Online reads data through the native SharePoint REST API and requests no additional API permissions. There is nothing to approve on the API access page of the SharePoint admin center.
Step 1. Upload the package to the app catalog
- Open the app catalog site of the tenant and go to Apps for SharePoint.
- Upload
vitextra.list-filter.sppkgor drag it into the list. - In the dialog that opens, select Enable this app and add it to all sites and confirm with Enable app. The package is built for tenant-wide deployment, so after this step the web part is available on every site of the tenant and does not need to be added to a site through Add an app.
The generic procedure, with screenshots of the app catalog and the deployment dialog, is described in KB10035. Installing Cloud-based Product.
📝 Note
The same package also registers the Open in List Filter command for the command bar of lists and libraries. The command stays hidden on every list until an administrator configures it in the tenant-wide extensions and sets the page it should open. If you do not configure it, nothing changes in your lists. The setup is described in KB10254. Opening Selected Items in List Filter Online from a Native SharePoint List.
Step 2. Add the web part to a page
- Open the modern page that should show the list and click Edit in the top right corner. If you need a new page, create it from New > Page on the site.
- Hover over the place in a section where the web part should go and click the + (plus) button.
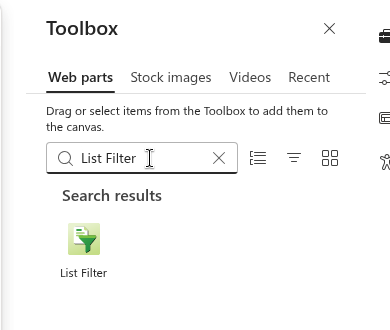
- In the toolbox, type List Filter in the search box, or scroll to the Documents, lists, and libraries group, and select List Filter.
The web part is added to the page and immediately shows the configuration checklist described in the next step.
The configuration checklist
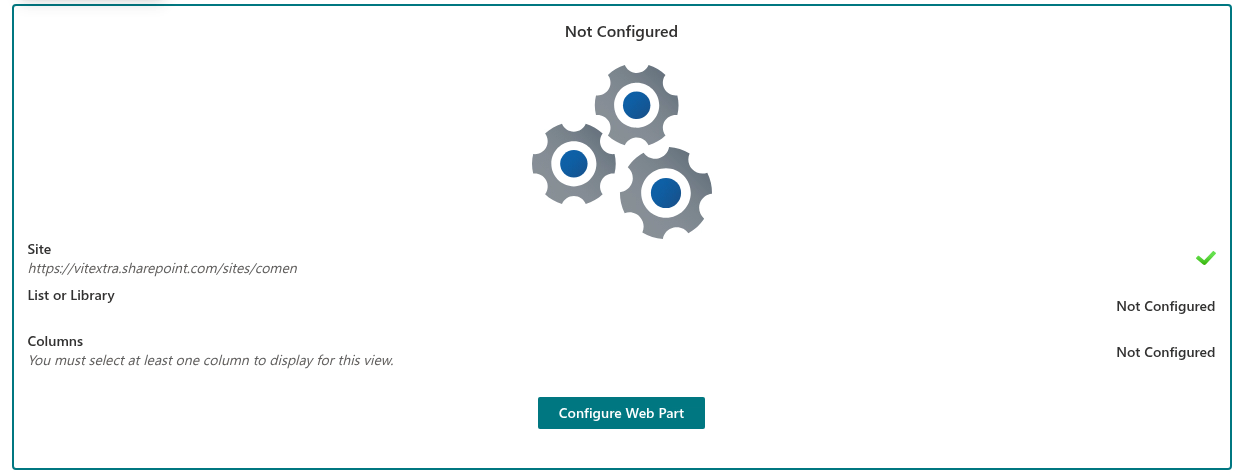
Until the data source is complete, the web part shows a checklist with the header Not Configured and three rows, each marked either with a check mark or with Not Configured:
- Site — the site that holds the list. By default the current site is already selected, so this row is usually complete at once.
- List or Library — the list or document library to display.
- Columns — the columns to show in the table. Until at least one column is selected, the row shows the message You must select at least one column to display for this view.
In edit mode the checklist ends with the Configure Web Part button, which opens the property pane of the web part. The same pane opens with the pencil icon of the web part.
Minimal configuration
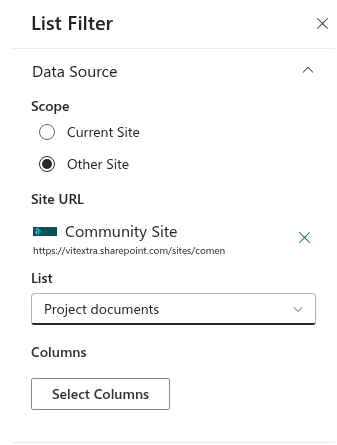
All three required parameters are in the Data Source group, the first group of the property pane.
- Scope. Keep Current Site to show a list of the site the page belongs to. Select Other Site to show a list from another site of the tenant: the Site URL picker appears below; type the name or URL of the site and select it from the suggestions. The selected site is shown with its logo, title and URL.
- List. Select the list or library from the drop-down. The drop-down lists the lists and libraries of the selected site.
- Columns. Click Select Columns. In the Columns panel, check the columns to show, in the Display column of the table, and click Save. At this point you can also change the Caption and Order of a column; the remaining options are described in KB10258. Configuring Columns in List Filter Online: Captions, Formats and Display Options.
As soon as the third parameter is in place, the checklist disappears and the web part shows the first items of the list.
❗ Important
Changing the site or the list resets the dependent settings: the selected columns, the filter pane columns and the predefined filter are cleared, because they belong to the previous list. Choose the data source first and configure the rest afterwards.
Publish and verify
Click Republish (or Publish for a new page). Open the page as a user would and check that:
- the table shows the expected columns and items;
- the users see only the items they have access to — the web part reads the list on behalf of the current user, so permissions of the list apply unchanged;
- the filter pane and the command toolbar are shown, if you want them. Both are enabled by default and can be switched off in the Filter pane and Command toolbar groups.
💡 Tip
The web part can also be the only content of a page: create the page from the Apps template (a single-part app page) and select List Filter. Such a page is convenient as a tab in a Microsoft Teams channel.
Updating to a new version
A new release of List Filter Online is installed the same way as the first one: upload the new vitextra.list-filter.sppkg to Apps for SharePoint, confirm that you want to replace the existing file, and select Enable this app and add it to all sites again. Because the package is deployed tenant-wide, every page with the web part picks up the new version on the next load; nothing has to be reconfigured, and the settings of the existing web parts are preserved. When a newer version is available than the one running on a page, the web part shows the message There is a new version of this app. Get it now. to the page editor.
Summary
Installing List Filter Online means uploading one .sppkg file to the app catalog with tenant-wide deployment and then adding the List Filter web part to a page and completing the three required parameters — Site, List or Library and Columns. After that the web part works for every user of the page with their own permissions.
💡 Tip
All settings of the property pane — folders, item limit, sorting, grouping, totals, the predefined filter and the filter pane — are described in KB10201. Configuring the List Filter Online Web Part. For the people who will use the page, see KB10252. List Filter Online: A Quick Guide for End Users.