My Tasks
 Overview
By default, the Azure DevOps Query Viewer web part only shows the results of a saved query. With Quick actions turned on, every row gets an Actions menu, and you can update a work item right where you see it: change its state, assign it to yourself or to a colleague, set or clear the due date, and add a comment. The change is written to Azure DevOps immediately, and only the updated row is refreshed, so the rest of the list stays as it was.
This article describes how an administrator turns the feature on, what each menu item does, and what to do when an update fails. The web part itself is described in KB10304. Azure DevOps Query Viewer: Setup and Connecting a Query.
❗ Important
Quick actions change real work items in Azure DevOps. Every change is saved under your name and appears in the history of the work item, exactly as if you had made it in Azure DevOps itself. There is no undo button in the web part: to revert a change, make the opposite change.
Before you start
- The web part is connected to an Azure DevOps organization, a project and a query.
- Your account can edit the work items in Azure DevOps. The web part works as the signed-in user and cannot do more than this user can do in Azure DevOps. If you only have read access, the menu is shown, but the updates are rejected by Azure DevOps.
- The permission user_impersonation for Azure DevOps has been approved by a tenant administrator in the SharePoint admin center. See KB10303. My Tasks: Required Permissions, Privacy and Security.
How an administrator turns on Quick actions
- Open the page and click Edit.
- Select the Azure DevOps Query Viewer web part and click the pencil icon to open the property pane.
- In the Miscellaneous group, turn on the Quick actions toggle.
- Publish the page.
The toggle is off by default. When it is off, the rows have no menu, and the web part is read-only.
The Actions menu
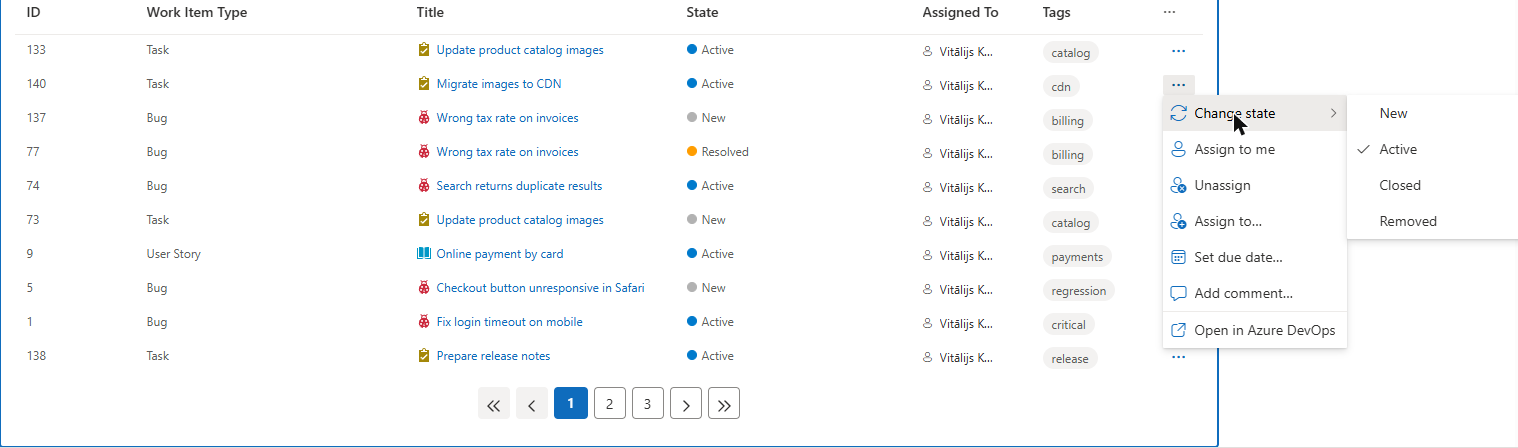
When the feature is on, a ... button (Actions) appears at the end of every row. Click it to open the menu.
| Menu item | What it does |
|---|---|
| Change state | Opens a submenu with the states of this work item type, for example New, Active, Resolved, Closed. The current state is checked. Click another state to move the work item there. |
| Assign to me | Puts you in the Assigned To field. |
| Unassign | Clears the Assigned To field. |
| Assign to... | Opens a dialog to assign the work item to somebody else. |
| Set due date... | Opens a dialog to set or clear the due date. The item is shown only if your project has the Due Date field. |
| Add comment... | Opens a dialog to add a comment to the discussion of the work item. |
| Open in Azure DevOps | Opens the work item in Azure DevOps in a new tab. |
Change state, Assign to me and Unassign are applied at once, without a dialog. While a row is being updated, its Actions button is unavailable.
Assigning a work item to another person
- Open the Actions menu and click Assign to....
- In the User name or email field, enter the name or the e-mail address of the person.
- Click Save.
Save becomes available when the field is not empty. Azure DevOps resolves the name; if it cannot find the person, an error is shown in the dialog and the work item is not changed.
Setting or clearing the due date
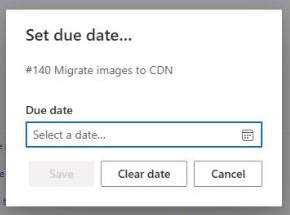
- Open the Actions menu and click Set due date....
- In the Due date field, pick a date in the calendar (Select a date...).
- Click Save. To remove an existing date, click Clear date.
📝 Note
The Set due date... item exists only when the project has the Due Date field (Microsoft.VSTS.Scheduling.DueDate). Some process templates do not have it. If you do not see the item, the field is not available in your project.
Adding a comment
- Open the Actions menu and click Add comment....
- Type the text in the Comment field. It is a multi-line field.
- Click Save.
The comment is added to the discussion of the work item under your name. Save is unavailable while the field is empty.
What happens after an action
If Azure DevOps accepts the change, the dialog closes and only the row of this work item is reloaded: you immediately see the new state, the new assignee or the new comment count. The other rows are not reloaded, so a state change does not remove a row from the list even if it no longer matches the query. Click Refresh or wait for the auto refresh to run the whole query again.
When an action fails
Azure DevOps checks every change against the rules of the process. The change is rejected, for example, when:
- you do not have the right to edit the work item;
- the transition to the chosen state is not allowed, or a field required in the new state is empty;
- the person you entered cannot be found or cannot be assigned in this project.
Direct actions (Change state, Assign to me, Unassign) show a red bar above the list: Update failed. followed by the message of Azure DevOps. Errors of the dialogs (Assign to..., Set due date..., Add comment...) are shown inside the dialog, which stays open so that you can correct the value or click Cancel. In both cases the work item stays as it was.
💡 Tip
If a state change is rejected because a field is required, click Open in Azure DevOps, fill in the field there and then try again. If the web part cannot load or update anything at all, see KB10307. Why Are My Tasks Missing or Not Loading?. Other features of the same web part are covered in KB10305. Azure DevOps Query Viewer: Multiple Query Tabs, Grouping, Search and Column Reset.