Discussions
What a board is
In Vitextra Discussions a board is a named forum with its own mode, categories and moderation setting. A site can have several boards — IT Help Desk, HR Questions, Course 101 — and each page or Microsoft Teams tab shows one of them. All boards of a site share the same five lists; a board is simply an item of the Discussions Boards list that topics refer to.
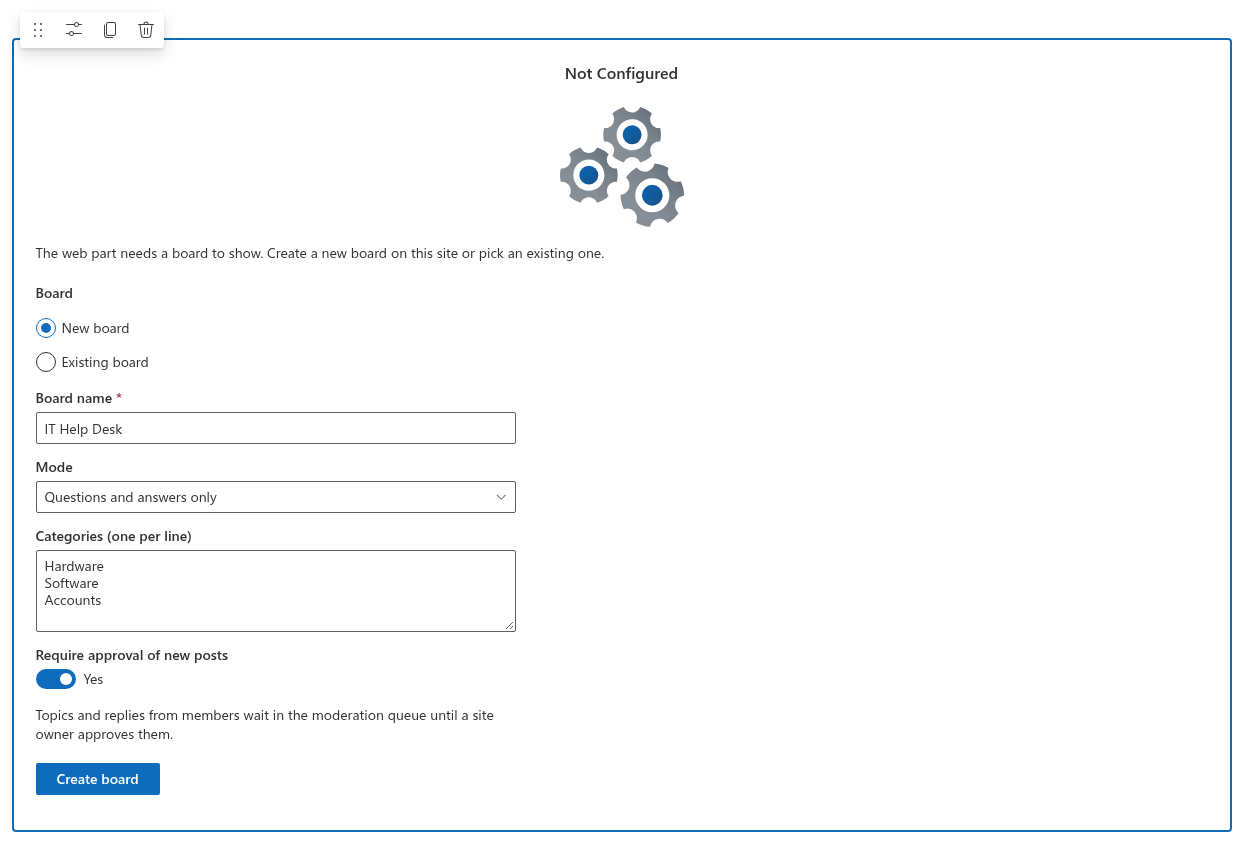
You create a board on the Not Configured screen of the Discussions web part, the first time the web part is placed on a page (see KB10391. How to Add and Configure the Discussions Web Part), or at any later time by adding the web part to another page and choosing New board. Creating the very first board on a site also creates the lists and therefore requires the Manage Lists permission; site owners have it.
Step 1. Name the board
Type the Board name — it is required and may be up to 255 characters. The name is shown in the Board drop-down of the property pane, in the board selection of the Discussions Activity web part and in the activity feed next to each topic, so make it recognisable: IT Help Desk rather than Board 1.
Step 2. Choose the mode
The Mode decides what kind of topics the board holds and which views the topic list offers.
| Mode | Topics | Views | Typical use |
|---|---|---|---|
| Discussions and questions (default) | The author picks the Type — Discussion or Question — in the new-topic form | Recent, Unanswered, Answered, Featured, My topics | Communities, project boards, class forums |
| Questions and answers only | Every topic is a Question | Recent, Unanswered, Answered, Featured, My topics | Help desks, HR or IT Q&A, expert forums |
| Discussions only | Every topic is a Discussion | Recent, Featured, My topics | Announcements with comments, open discussion |
A Question can receive a best answer: the author or a moderator clicks Mark as answer on a reply, the topic gets the Answered badge and moves from the Unanswered view to the Answered view. The answered state follows the accepted answer, so a question keeps it even when a moderator locks the topic, and loses it when the accepted reply is unmarked or deleted. A Discussion has no answered state. In the Discussions only mode the two Q&A views are hidden because they would always be empty.
📝 Note
The mode controls new topics and the views; it does not convert existing topics. If you switch a board from Discussions and questions to Questions and answers only later, discussions that were already posted keep their type.
Step 3. Define categories
In Categories (one per line) list the categories of the board, each on its own line, for example:
Hardware
Software
Accounts and access
Blank lines are ignored, surrounding spaces are removed and duplicate names (regardless of letter case) are kept only once. When a board has categories:
- the new-topic form shows a Category drop-down with the option No category and the categories of the board, so a category is optional for the author;
- the topic list shows a category drop-down with All categories and one entry per category, and the category of each topic next to its last activity — as long as Show categories is switched on in the property pane.
Leave the field empty if you do not need categories; the drop-downs are then not shown at all. Categories can be added or renamed later (see below); topics keep the category text they were posted with, so after renaming a category the old topics still show the old name until the author or a moderator moves them with Edit in the topic view.
Step 4. Decide on approval
The toggle Require approval of new posts turns pre-moderation on for the board:
- No (default) — topics and replies are visible to everyone as soon as they are posted.
- Yes — topics and replies written by members are created with the Awaiting approval status and wait in the moderation queue. The author sees the post with an Awaiting approval badge and the message Thank you. Your post will be visible after a moderator approves it.; other members do not see it yet. Posts by moderators — users with the Manage Lists permission — are approved immediately.
Moderators open the queue with the Moderation button of the board. It lists Topics waiting for approval and Replies waiting for approval, reported topics and replies, and Rejected topics and Rejected replies, with Approve, Reject and Delete actions; Delete asks for confirmation first. A rejected post stays in the list with the Rejected status and is visible only to moderators and to its author, who sees it with the Rejected badge; a moderator can approve it later from the Rejected topics or Rejected replies section.
❗ Important
Approval is a per-board setting and applies to members only. Anyone with the Manage Lists permission on the site — all site owners, and in Microsoft Teams all team owners — posts without approval and sees every pending and rejected item. If only a few people should moderate, keep the owners group small. The visibility rules are described in KB10430. Why a Post Is Not Visible: Approval, Rejection and Visibility Rules.
Step 5. Create the board
Click Create board. The web part creates the lists if the site has none — and adds any list or column that is missing on a site set up by an earlier version — adds the board item and switches to the empty board with the message No topics yet. Start the first one. Publish the page, and members can start posting with New topic.
Changing a board later
Moderators — users with the Manage Lists permission — change a board from the web part itself, in read mode as well as in edit mode. Open the board and click Board settings (the gear icon) in the command bar; a panel opens with the same settings as the creation form:
| Field | Values | Effect |
|---|---|---|
| Board name | Text, required | The board name shown in the property pane and in the activity feed |
| Description | Text | Optional description of the board; stored with the board, not displayed by the web part in this version |
| Mode | Discussions and questions, Discussions only, Questions and answers only | The mode of the board |
| Categories (one per line) | One category per line | The categories offered to authors and in the filter; cleaned in the same way as when the board is created |
| Require approval of new posts | Yes / No | Pre-moderation of posts by members |
Click Save. The board reloads with the new settings right away; other pages that show the same board pick them up when they are next loaded.
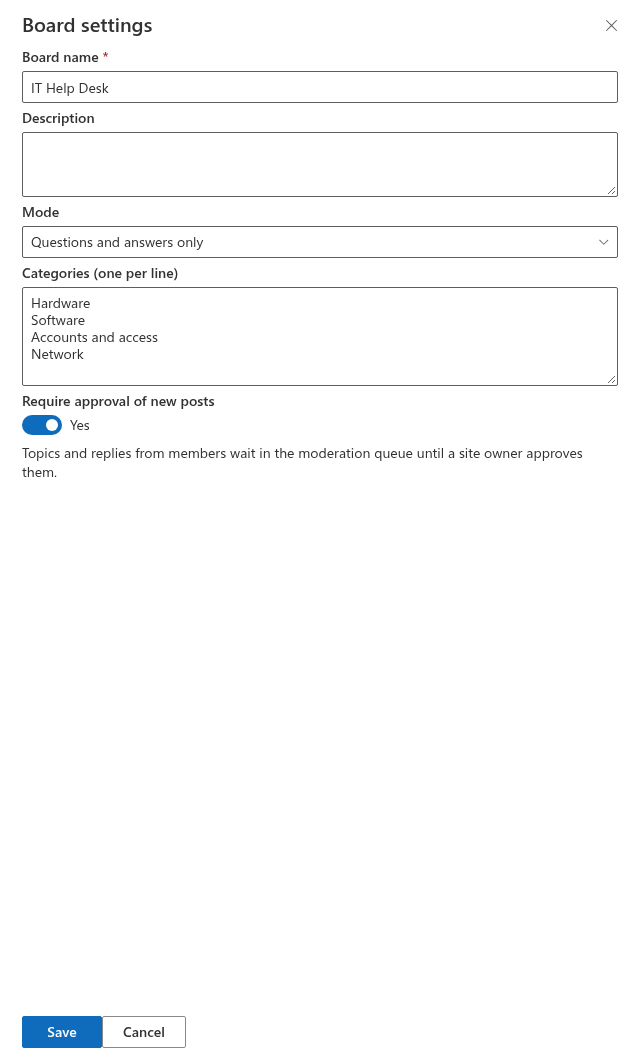
The board remains an item of the Discussions Boards list, so it can also be edited there like any list item — open Site contents, the Discussions Boards list and the item of the board, and click Edit. The columns correspond to the fields of the panel:
| Column | Values | Field of the panel |
|---|---|---|
| Title | Text | Board name |
| Description | Text | Description |
| Mode | Discussion, QnA or Mixed | Mode: Discussions only, Questions and answers only or Discussions and questions |
| Categories | One category per line | Categories (one per line) |
| Require approval | Yes / No | Require approval of new posts |
The web part reads the board every time the page is loaded, so a change made in the list is visible after a refresh. Do not delete a board item that still has topics: the topics would remain in the Discussions Topics list without a board to show them.
💡 Tip
Several pages can show the same board, and one site can host several boards; the Board drop-down of the property pane switches a web part to another board without touching the content. The structure of the lists is described in KB10426. Discussions Lists and Columns Reference, categories in more detail in KB10423. Organizing Topics with Categories, and the day-to-day work of moderators in KB10409. Moderating a Board: Approval Queue, Rejecting and Dismissing Reports.