Absence & Coverage
Overview
The My Absences web part does not write to your calendar by itself. To show a vacation or a business trip in Outlook, Google Calendar or Apple Calendar, you download the request as a small .ics file (iCalendar) and open it in your calendar application. The file contains one all-day event for the whole absence.
This article explains where the download icon is, what the file contains and what it does not, how to import it, and why the event in your calendar does not follow later changes of the request.
Download the file
- Open the page with the My Absences web part. If needed, use the year arrows to find the request.
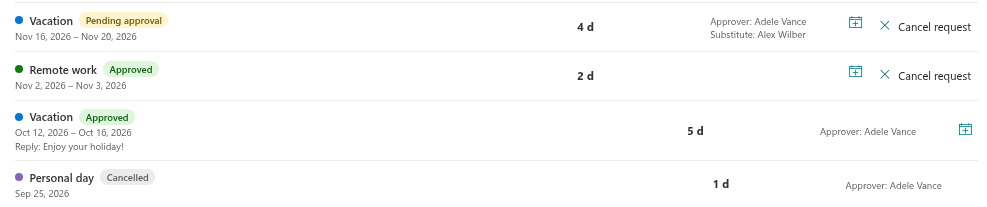
- In the section My requests, 2026, find the request.
- Click the Add to my calendar icon on the right of the row.
- Your browser downloads a file named
absence-<number>.ics, where the number is the ID of the request.
The icon is available only for requests that are Pending approval or Approved. Rejected and cancelled requests do not have it.
What the file contains
| Property of the event | Value |
|---|---|
| Title | The name of the absence type, for example Vacation |
| Duration | One all-day event from the first to the last day of the absence |
| Availability | Busy |
| Identifier | absence-<number>@vitextra.com, the same every time you download the same request |
| Not included | Half-day information, your comment, the substitute, the approver, the status |
Because the file does not contain the half-day information, a request that starts or ends at midday still appears as full days in your calendar.
📝 Note
The event spans all calendar days of the request, including weekends and public holidays inside the period. It is a plain calendar entry; the working-day count of the request is not part of it.
Import the file into your calendar
The exact commands depend on the application and its version, but the idea is always the same: open or import the downloaded file and save the event in the calendar you want.
Outlook (classic). Open the downloaded .ics file from the browser's download list or from your Downloads folder. Outlook shows the event; save it to your calendar. In new Outlook, use Calendar > Add calendar > Upload from file. Microsoft instructions.
Google Calendar. Google Calendar on the web imports a file through the import option in the calendar settings. Select the .ics file and the target calendar, and confirm.
Apple Calendar. Open the file with Apple Calendar, or drag it onto the calendar window, and choose the calendar to add the event to.
After the import, check that the event appears on the right days and in the right calendar.
The event is a snapshot
❗ Important
The file is a copy of the request at the moment of the download. The web part does not keep the event in your calendar up to date. If the request is later rejected, cancelled or changed, delete the event in your calendar yourself.
This matters most for a request that is still Pending approval: the file looks the same as one for an approved request, so your calendar shows a confirmed absence that your manager may still reject. Wait for the status Approved before you import, or remember to remove the event if the request is rejected (KB10329. Absence Request Statuses: Pending, Approved, Rejected and Cancelled).
Duplicates after a second download
Each download creates a new file, and every file of the same request carries the same identifier. Many calendar applications use that identifier to update an existing event instead of adding a second one, but this behaviour depends on the application. If you import the same request twice and a duplicate appears, delete one of the events. To avoid it, import a request once, and only again if you have to refresh it after a change.