Exclude accounts from search results
This article describes how to exclude users from search results in Employee Directory.
Introduction
Employee Directory support two types of data source:
- Azure AD
- User Profiles
In the case of using Azure AD blocked user accounts are not displayed by default. Otherwise, if you use User Profiles (actually the app uses SharePoint search index) in some cases disabled accounts may appear in search results.
This article describes how to fix this issue.
Filtering Search Results
There are two filter criteria that are applied to each search request:
- SPS-UserType equals 0
- SPS-HideFromAddressLists does not equal 1
The first filter criteria used to show only users and exclude groups (SharePoint or Security group).
The second one is to hide users marked with Hide from address lists.
💡 Tip
SPS-HideFromAddressLists is the only OOTB property to hide users from search results globally. The property is not editable and can be changed only by the system within the sync process.
Option 1. Manually Hide User
Manually hiding a user from search results based on updating the corresponding mailbox in Exchange Online.
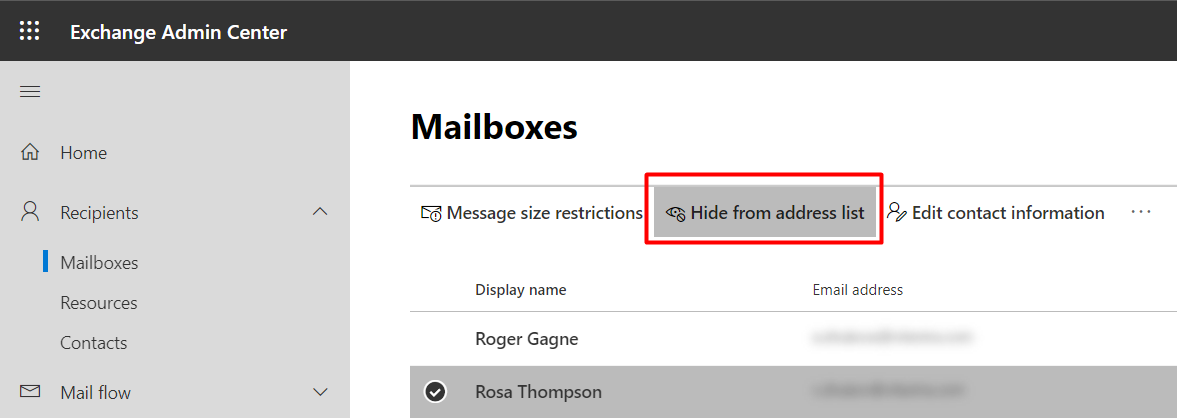
Step 1. Find the mailbox
To manually mark a user as hidden go to Exchange Online Admin Center and select Mailboxes under the Recipients heading.
Step 2. Mark mailbox as hidden from address lists
To hide users from the address list select one or more mailboxes and click Hide from the address list button on the toolbar.
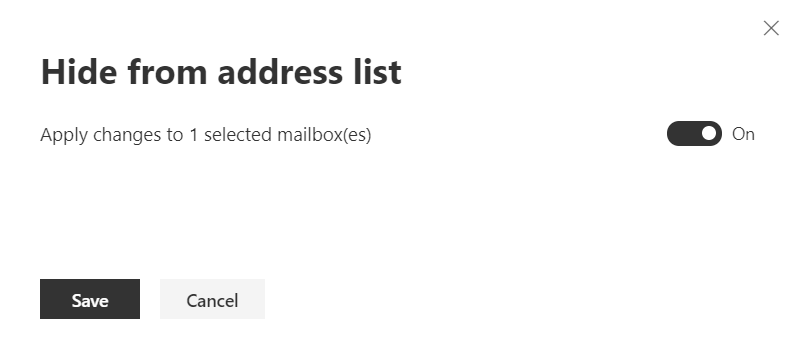
And confirm the action by clicking Save button:
Once SharePoint crawler updates the property in search index the user will not appear in search results.
📝 Note
It may take up to 24 hours to update data in SharePoint search index.
Option 2. Custom User Property
The second option is to create new custom user profile property that is available for editing and make this property available for searching. This approach is time-consuming due to the fact that there is no sort of trigger to update the search schema in SharePoint Online.
📝 Note
Modification of search schema in SharePoint Online may take a while and there is no functionality to apply changes immediately.
Step 1. Create new User Property
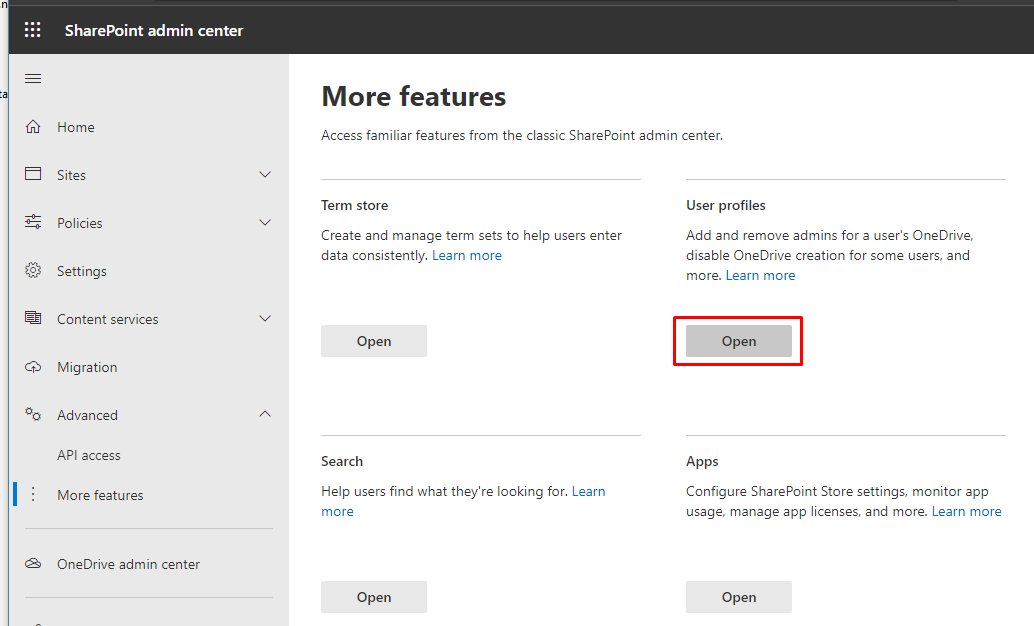
To create new user property go to SharePoint Admin Center > More Features and select Open under User profiles section.
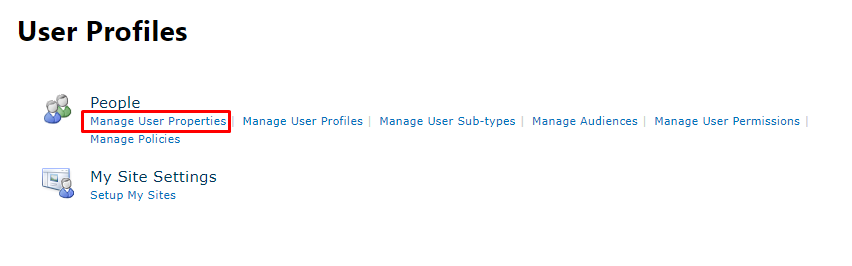
Select Manage User Properties:
Select New Property:
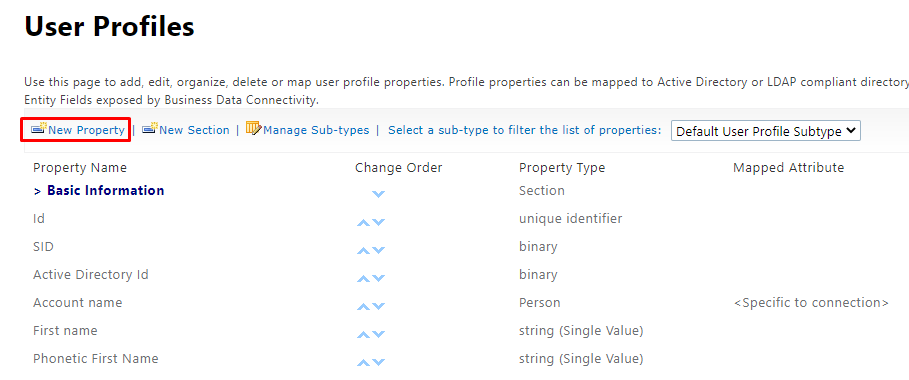
Ensure the following options:
- Type: boolean
- Policy Settings: Optional
- Default Privacy Settings: Everyone
- Check Show in the profile properties section of the user's profile page
- Check Show on the Edit Details page
- Check Indexed
Other fields leave as is.
Click OK to create a new property.
Step 2. Update User Profile
To make the SharePoint crawler add a new property to index open one or more profiles and check the new field.
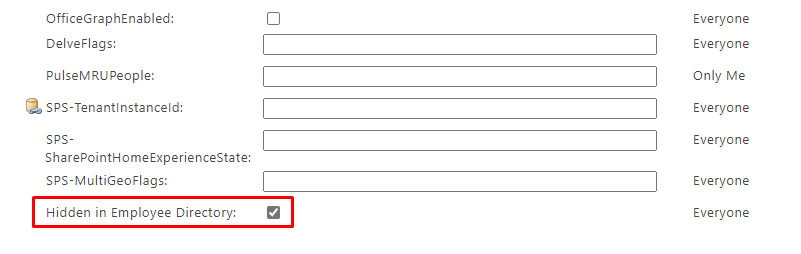
📝 Note
The new user profile property does not appear in search schema until it will be updated in at least one user profile.
Step 3. Ensure Crawled Property Exists
Go to SharePoint Admin Center > More Features > Search and select Manage Search Schema
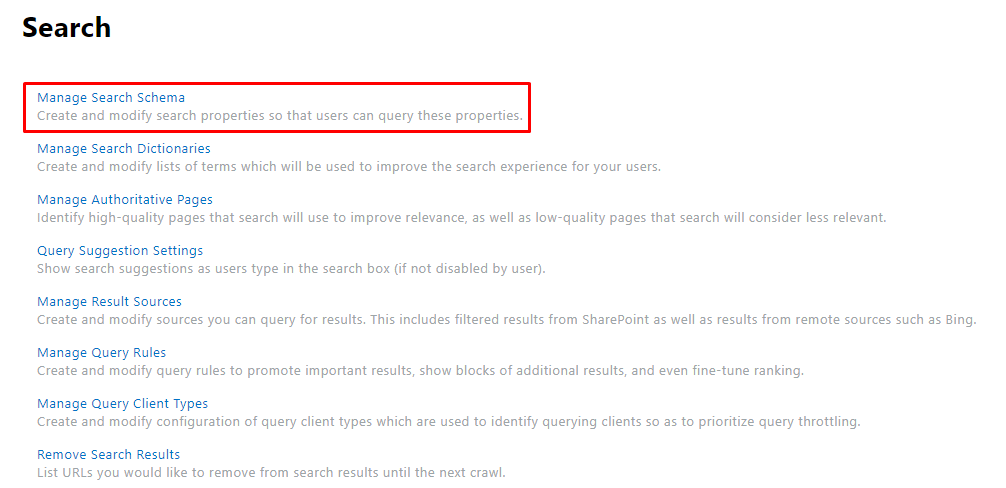
Wait until new crawled property shows up in the search schema.
📝 Note
Usually, it takes from 15 minutes to 4 hours for the new crawled property created by SharePoint search service.
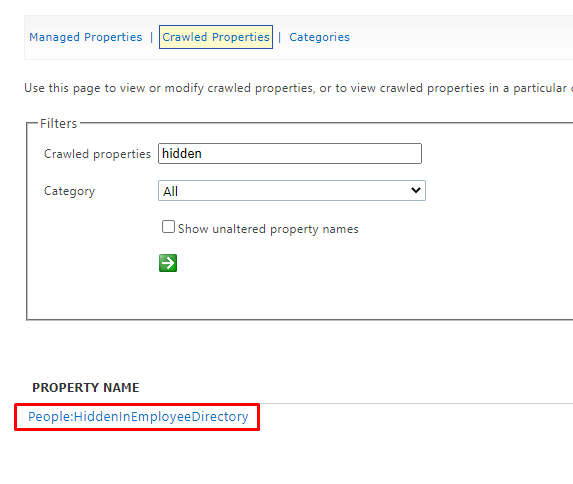
Step 4. Create Managed Property
To be able to filter search results you need to create a managed property and map the crawled property to it.
Go to Managed Properties and select New Managed Property.
Ensure the following settings:
- Property Name: HiddenInEmployeeDirectory
- Type: Yes/No
- Check Searchable
- Check Queryable
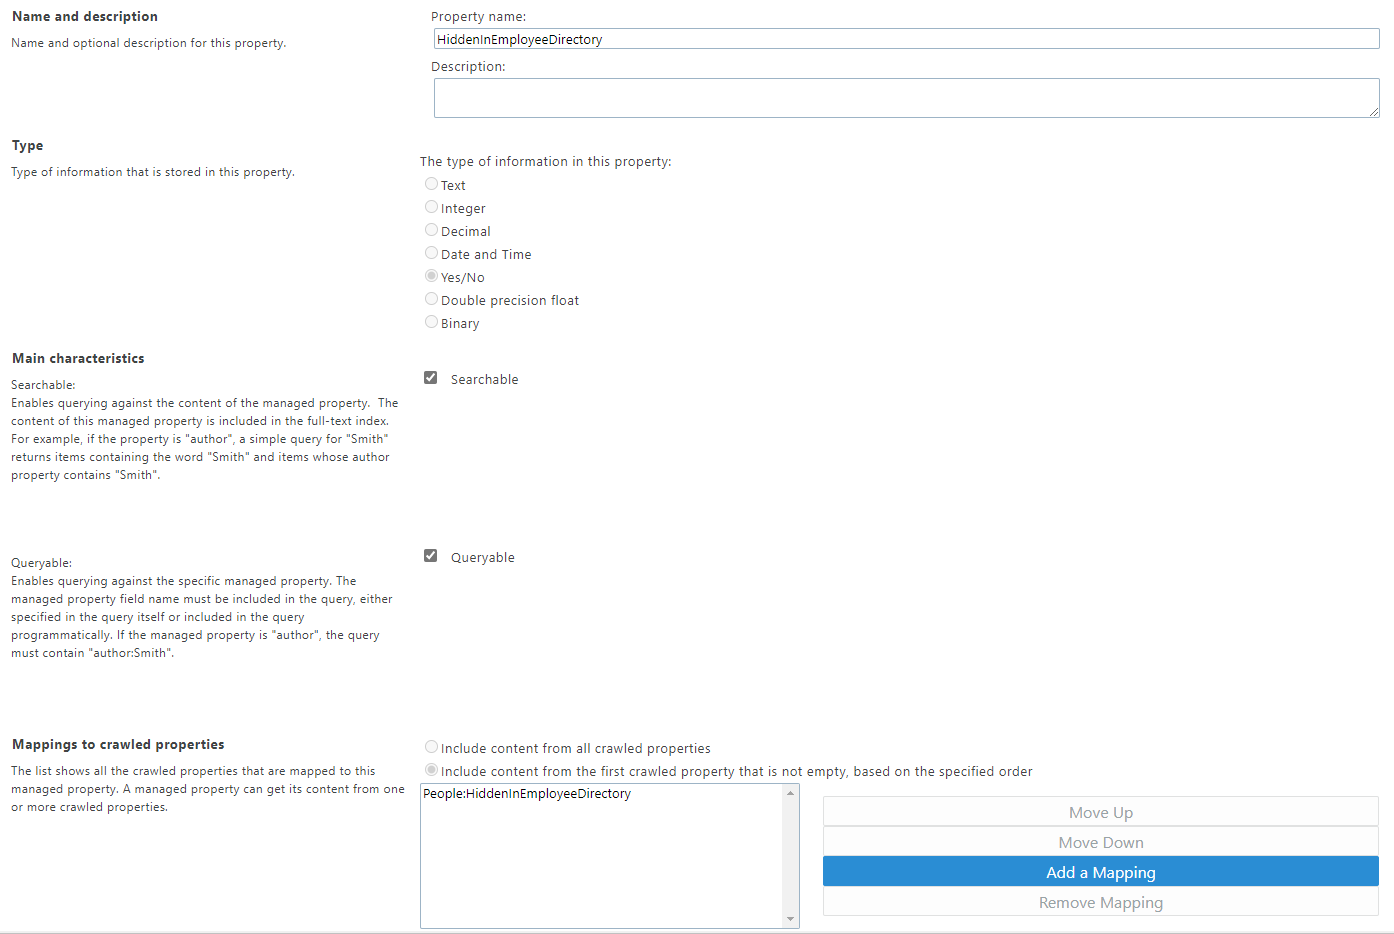
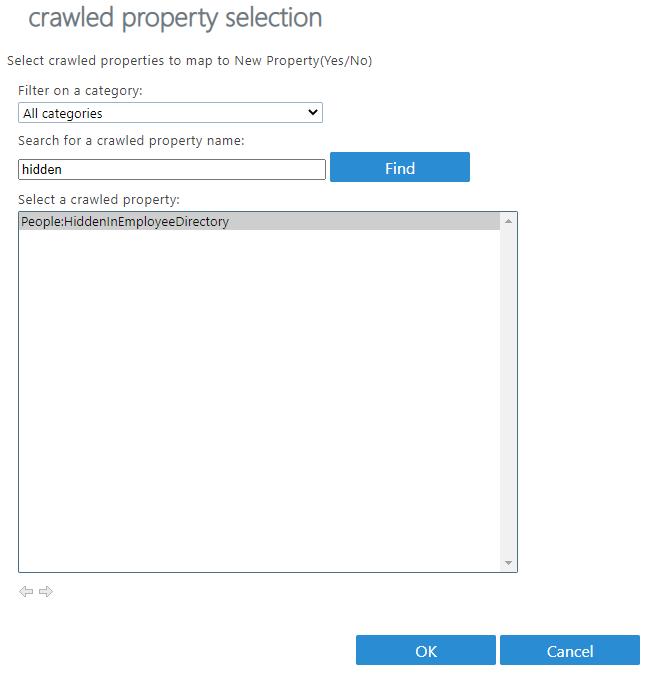
Add Mapping to the new crawled properties created on step 3. Select Add a Mapping, type in hidden in search field, and select People:HiddenInEmployeeDirectory property.
Click OK to create a new managed property.
Step 5. Update the Profile Property for All Users
# SharePoint Admin Center URL
$AdminSiteURL = "https://vitextra-admin.sharepoint.com"

# Getting credentials to connect to SharePoint Admin Center and Azure AD
$Cred = Get-Credential

# Connect to Azure AD
Connect-AzureAD -Credential $Cred | Out-Null

#Getting all users from Azure AD
$AllUsers = Get-AzureADUser -All:$True -Filter "UserType eq 'Member'"

# Connect to SharePoint Admin Center
Connect-PnPOnline -Url $AdminSiteURL -Credentials $Cred

$counter = 0
$counterEnabled = 0
$counterDisabled = 0

ForEach($User in $AllUsers)
{
    # User account name
    $UserAccount = "i:0#.f|membership|$($User.UserPrincipalName)"

    Write-host "Update user profile for $($User.UserPrincipalName)" -ForegroundColor DarkGreen

    if($User.AccountEnabled -eq $True)
    {
        Set-PnPUserProfileProperty -Account $UserAccount -PropertyName "HiddenInEmployeeDirectory" -Value $False
        $counterEnabled++
    }
    else
    {
        Set-PnPUserProfileProperty -Account $UserAccount -PropertyName "HiddenInEmployeeDirectory" -Value $True
        $counterDisabled++
    }
    $counter++

    Write-Progress -Activity "Updating HiddenInEmployeeDirectory property..." -Status "Enabled: $($counterEnabled), Disabled: $($counterDisabled), Total: $($AllUsers.Count)" -PercentComplete (($counter / $AllUsers.Count)  * 100)
}
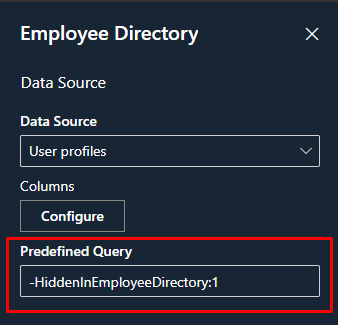
Step 6. Set Predefined Query of the Web Part
In the Web Part settings set Predefined Query Property to exclude users which marked as hidden for Employee Directory:
❗ Warning
Search results will be empty until the new Managed Property is empty. It may take up to 24 hours to populate the new managed property.
Summary
Our needs:
- To exclude users from search results we create a managed property.
- To populate the managed property we create a crawled property.
- To populate the crawled property and manage what data goes to the property we create a user profile property.
And steps produced according to the needs:
- Creating new user property to manage which users presented in the search results
- Waiting for new crawled property created by SharePoint
- Creating new managed property and map it to the crawled property
- Set predefined query property to exclude users from the search results.